
| General Tip - Novice |
||
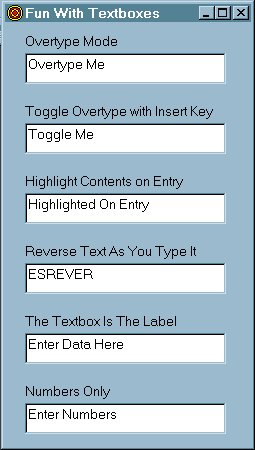
Fun With Textboxes :
The code for overtyping is the height of simplicity. Set the SelLength property of the textbox to 1 on the KeyPress event. That highlights the next character after the cursor position so the character you type overwrites it. Private Sub txtOvertype_KeyPress(KeyAscii As Integer) Toggling overtype mode has at its core the simple code for overtyping, but is complicated by the need to determine whether overtyping is currently desired. Note: Set the KeyPreview property of the form to True. This code goes in General Declarations of
the form: Private Sub Form_Load() At the form level check for the insert key being pressed and toggle overtype mode. This is also where it's possible to toggle a visual indicator of whether insert mode is active, much the way Microsoft Word does on its status bar. In this example the color of a label is toggled. Private Sub Form_KeyUp(KeyCode As Integer, Shift As
Integer) Finally, the code that does the overtyping in the KeyPress of the textbox, but only if overtype mode is true. Private Sub txtToggle_KeyPress(KeyAscii As Integer) Highlight Textbox Contents On Entry: This is another task that is the height of simplicity once you see how it's done. It is worth being aware that GotFocus and LostFocus events should be used cautiously, especially together. However, in my experience this code is reliable in and of itself. Private Sub txtHighlight_GotFocus() This one is mostly for fun, as a demonstration of things that can be done easily with textbox code. Private Sub txtReverse_KeyPress(KeyAscii As Integer) Use Default Text As Non-Blankable Entry Instruction "Label": I used this trick in a small application in order to save the space that would be occupied by a label accompanying each textbox. It involves making the default text of the textbox the "label" indicating what to enter or similar information to give the user a clue why the textbox exists, then making it so the default text cannot be blanked out. When collecting data in the end, not shown here, I simply treated a textbox containing the default text as if it contained nothing. Whether a UI designed this way rather than with labels is appropriate is another question.... Note: Set the Tag property of the textbox and the default Text property to exactly the same value. Private Sub txtLabel_GotFocus() Restrict Entry to Numeric Characters: This allows only numbers to be entered. It could easily be modified to allow certain other characters such as the period, to enter decimal numbers. Other code could prevent there from being more than one decimal point, to ensure it it a valid decimal number if that is the goal. However, this gets the process started on the key point. Private Sub txtNumbers_GotFocus() If you would really like to see the entire sample project (done in VB5), download it here. Enjoy!
|
||
|
|
||
[ Back To The Top ]
Contact: web@xtremecomp.com
All contents copyright XTreme Computing unless noted
otherwise.